
Digging a pond with heavy machinery is a long process, but it’s made even longer if you choose to do it by hand. Whether you don’t have access to bulldozers and excavators or you want to enjoy the hard-earned experience, you’ll soon know everything there is to know about digging a pond by hand.
To dig a pond by hand, start by plotting the land, learning the soil types, and choosing your equipment. You’ll need a sturdy shovel, safety gear, and possibly a jackhammer. Dig the hole working from the center outward. Finally, add boulders, rocks, and liners for optimal water retention.
Throughout this article, you’ll also learn the following info about how to dig a pond by hand:
- Eight useful steps to simplify the process and get the pond completed
- How you can choose the perfect spot for your hand-dug pond
- Different treatment and maintenance methods
Decide the Shape and Size of the Pond
There are all sorts of shapes that you can choose when you’re digging a pond by hand. Freeform, square, and circular ponds tend to be the most common, but you can choose a variety of other shapes. If you choose to fill it in with gunite and cement, you can create Greco-Reman shapes, too.
Before you start digging and learning the soil, consider these suggestions:
- Steemit suggests that the sides of the pond should always slope inward. If you want the structure to hold for many years to come, then sloping it will be the best course of action. When it goes straight down, the walls tend to cave. Rocks and soil will fall inside, not to mention that it’ll be dangerous to walk around.
- Remember to determine how wide, long, and deep you want the pond to be. Deciding as you go can result in a plethora of problems. For example, if you dig too deep, you might run into dense roots, sewage pipes, and electrical conduit. Since you’re digging by hand, these obstacles can become impenetrable.
- Keep the pond away from too many plants. Plants contain a variety of compounds that are necessary to breed life. In other words, leaves, pines, and pollen fall into the pond, creating algae and several forms of bacteria. You’ll end up spending twice the time and money trying to keep it clean.
- Bigger ponds require more of an investment. Not only does it cost more money to rent equipment to dig it out, but you’ll have to get more rocks, liners, plants, and fish to fill the space. Maintenance kits will cost more to cover the gallon total. However, many pond owners believe that it’s more than worth the difference.
As you can see, there’s a lot to consider before you get a shovel and start digging. You’ll need to have everything blueprinted to make sure that you’re not getting yourself into a disaster.
Also, keep in mind that many ponds have plumbing pumps, filters, heaters, UV systems, and more. If you want these additions, consider hiring a professional to come out and decide where it should all go.
To figure out the importance of the different types of soil, proceed to the next section.
Other helpful articles: Can a Pond Be in Full Sun? The Pros and Cons.
Learn More About the Soil
The soil is one of the most important factors relating to when, where, and how you’ll dig the pond. Furthermore, the soil density will impact how long it takes for you to get the job done. Some types of soil will be far too difficult to remove with a shovel. Even if you get it finished, it’ll take months.
There are three types of soil that you’ll likely encounter when digging a pond by hand. Let’s discuss them below to give you a better idea of what you should expect.
- Dirt is undoubtedly the most common type of soil in most places. It’s also one of the easiest soils to remove, so you shouldn’t have any trouble with it. Plumbing is simple, piling dirt on the outskirts of the hole is a breeze, and it’s not too heavy. However, you might encounter roots, rocks, and other debris that could make it more difficult.
- Clay isn’t as common on the surface, but it’s found below the dirt in many parts of the US and other countries. If you run into clay while you’re digging with a shovel, you’ll have a tough time removing it. Clay is known for being dense and heavy. Fortunately, it has excellent water retention.
- Sand is a tough one to deal with because it’s loose and caves inward. It’s also very heavy, especially if it’s wet and you’re repeatedly scooping it out with a shovel. The good news about sand is that it’s as easy as it gets when it comes to digging. You don’t have to push through dense clay or tough roots to pull it out.
These three soils aren’t the only types, but they’re the most common in most parts of the world. The soil not only determines the aforementioned factors, but it also affects what tools you’ll need to use, as you’ll see in the next section.
Once you know the soil and you’re ready to get your digging equipment ready, read on.
Choose Your Shovel (and Other Equipment)
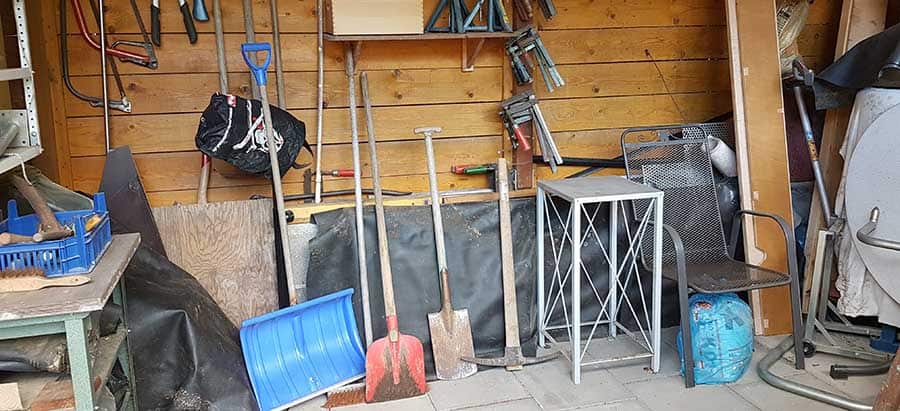
Now that you’re ready to get your gear set up, it’s time to choose your shovel(s), jackhammers, wheelbarrows, and other items. Remember that you might not need some of these products, but it’s a good idea to have more than you’ll need than not enough. The shovel needs to be tough enough to handle thousands of scoops.
Here’s what you should look for when you’re getting equipment to dig your pond:
Make Sure the Shovel Is Comfortable to Use
The CS Monitor details an interesting story of a man who dug with a shovel for countless hours. After thousands of scoops and moving back and forth, he was physically incapable of moving on. The point of mentioning this story is that you need to choose a shovel that you’ll be able to use for a long time.
Don’t cheap out on an inexpensive, low-end shovel. Search for all of the features that you want if you know you’ll be sticking with one shovel. An ergonomic handle is an excellent start, as is a cushioned layer to keep your hands comfortable throughout the process. You might notice that the padding gets limited after hours of use, in which case you could rely on padded gloves (link to Amazon).
You can find a great shovel on Amazon with a fiberglass handle and comfort step. It’s a bit more expensive than other shovels but if you’re using it for a few hours, it’s definitely worth the money.
It Should Be the Right Shape and Size
Another detail that people always forget to think about is the shape and dimensions of the shovel. If you’re tall with long arms, then you should opt for a long shovel. The size of the shovel’s head should also be considered. Long shovel handles give you more power, handling, and control of the process.
Consider Additional Equipment
Other equipment that you might need for digging a pond by hand include jackhammers for dense clay, rocks, and roots, wheelbarrows to carry the soil, and an axe to break apart roots (if you’re not using a jackhammer).
It’s best to have everything set aside by the pond before you start digging. There’s no need to run back and forth, getting everything or having to run to the store in the middle of the project. Once you get everything that you need, it’s time to put the shovel to the soil.
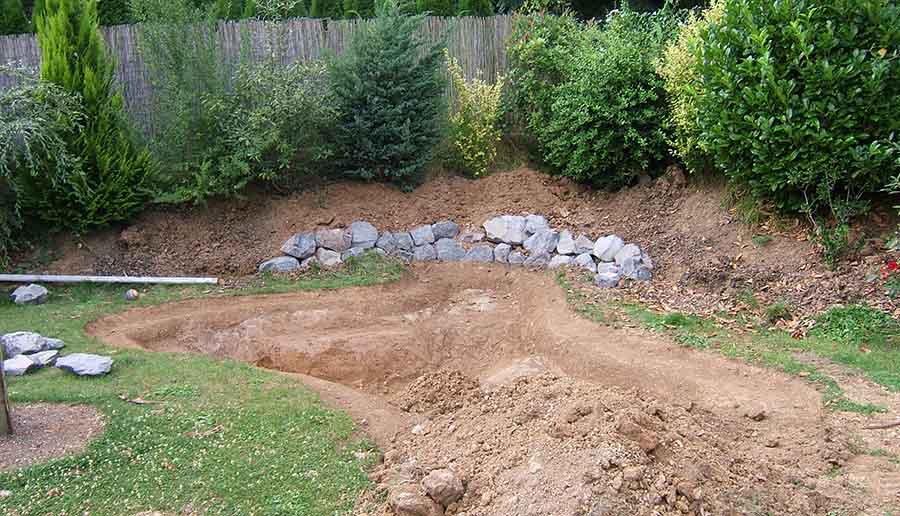
Start Digging the Hole
Digging is often the part of the process that most people don’t want to think about. It’s easy to get your gear ready to use and dump the water on the hole, but digging is tedious and tough. It’s not the easiest thing to do, but it’s not something you’ll forget any time soon. However, people dug ponds for centuries before heavy machines were invented, so you can too.
Here’s the step-by-step process to dig the pond:
- Use a shovel to outline the pond. Indent the soil or dig a mini trench that’s about six inches deep in the shape that you created from the first section of the article. This outline will serve as a start and finish point so you can dig freely without having to worry about leaving the boundaries.
- Start digging in the center of the pond. Digging from the middle is the best course of action because you won’t have to worry about falling into it. Try to remove a few feet of dirt, level out the hole, so it’s all the same depth (sloping in from the edges), and then move back to the center and do it again.
- Remove the debris from the hole. As you remove the sand, clay, or dirt from the pond, you’ll undoubtedly encounter roots, rocks, plants, and other debris. Use a pointed shovel to cut them apart and throw them out of the hole. You should use a different shovel for this step, so you don’t damage the digging tools.
- Loosen and compact the soil as you go. You can loosen the soil by pushing it down repeatedly with the sharp end of the shovel. This step might seem like it’s unnecessary, but it makes it much easier for you to remove the dense earth below the surface. When you have the edges to the desired level, compact them with the flat side of the shovel.
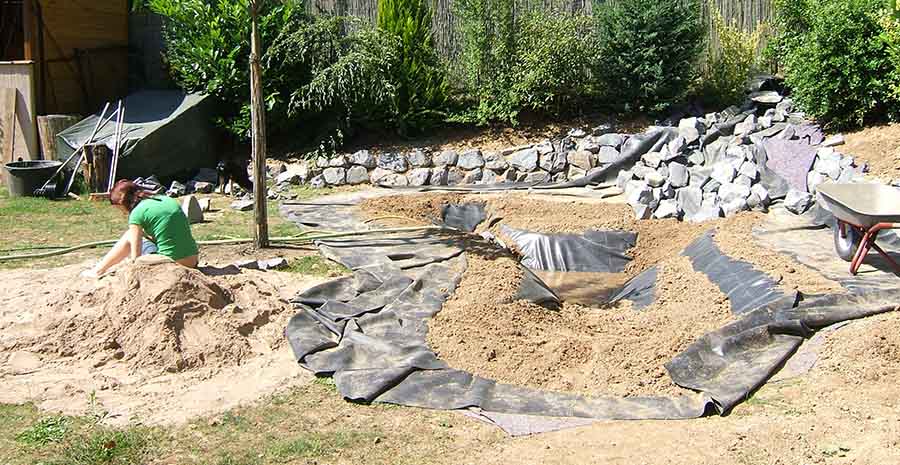
- Create ledges if you’re digging out sand. Sand is loose and tends to fall and cave in. When you have the general shape of the pond established, cut ledges into it. There will be dirt or clay a few feet below the surface that you can work with. The ledges will serve as a boost to the structural integrity of the pond.
Other helpful articles: Can A Pond Be Too Deep?
Add Boulders, Rocks, and/or Rubber Liners
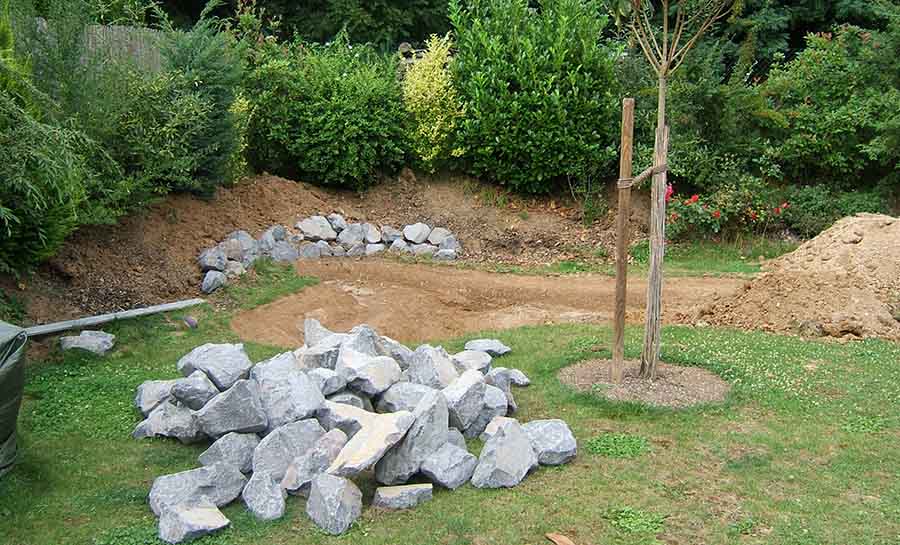
Now that the hole is dug and the pond has been shaped, you’ll have to decide how you’ll prevent excess water drainage. Boulders, small rocks, and rubber liners are the most popular choices. They all have unique properties that make them a top choice, so let’s inspect everything below.
Other helpful articles: Can You Use a Tarp as a Pond Liner?
Can You Use Boulders for Water Retention?
Boulders work excellently for water retention. You’ve probably noticed that a lot of natural ponds, lakes, and rivers have plenty of boulders along the bottom. They act as a barrier between the soil and the water, keeping it from soaking into the ground too quickly. Line the ledges and bottom of the pond with boulders before you fill it.
Should You Fill Your Pond With Small Rocks?
Much like boulders, small rocks are known for reducing the amount of water that falls through the soil. The only difference is that they don’t look as good as boulders, but they have fewer cracks for the water to slip through. It’s more of an aesthetic choice than anything else. Some pond owners prefer to line the ledges with pebbles and the bottom with boulders.
Will Rubber Liners Work?
Rubber liners have been used for quite some time to prevent water from seeping through the soil. They’re a bit pricey, especially if you’re searching for one that fits a custom-sized pond. You could get the liner before you dig the hole, so you know what dimensions to follow. Rubber liners require regular brushing to prevent algae build-up.
Pick Different Plants and Fish
Always choose local plants and fish to go into your pond. Bringing them from out of the area can be dangerous for them, but it also endangers the environment by introducing foreign species. When you’re choosing new life to go into your pond, you also need to think about the present conditions. Are there too many rocks? Are the algae dangerous to them?
Plants and fish are an excellent addition to your pond. They’re colorful, lively, and fun for everyone to look at. If you’re adding them into your pond, then you need to make sure that there’s enough space for all of them to thrive. Research about how much room they need to move around. If the fish feels overcrowded, they’ll attack each other.
The only problem with adding plants and fish to the pond is that you’ll have to regulate the water much more than usual. You’ll need to make sure there’s no chlorine in the water that you add (you’ll find more about this topic later in the post), remove certain types of dangerous algae, and keep the water semi-clear.
Off the Grid News suggests that you dig the pond at least three feet deep, so there’s enough space for the plants to grow and the fish to swim. Anything less than that would leave them feeling trapped. Consider digging down to six feet or more if you want to introduce bottom feeders into the pond. They’ll eat the algae, droppings, and decayed plants on the bottom.
Fill the Pond and Treat the Water
There are countless ways to fill the pond. You could use well water, runoff from another river or lake, or a garden hose. All of these methods require treatment to keep the fish and plants thriving. Before you add any of the aforementioned life forms to the pond, you’ll need to treat the water.
Filling the pond with hose water requires a whole lot more added to your water bill. Always call the city before you fill anything more than a few hundred gallons. Some places will impose a fine if you use thousands of extra gallons than you usually do. Expect at least a day or two for the pond to fill.
Other less common methods include using well water as mentioned above, siphoning water from a hydrant, calling a water service to bring truckloads of water, and many other tips. Make sure that you’re aware of algae and bacteria in the water source that you choose.
Other helpful articles: How to Add Water to a Pond: The 9 Do’s and Don’ts.
Maintain the Pond Regularly
- Consider hiring a professional company to come out weekly or bi-weekly. They’ll take care of everything for you so you can rest easy. No need to run out to add chemicals or test the water. You’ll be able to enjoy the beauty of a pond without the maintenance and early mornings.
- Use the API Pondcare Master Liquid Test Kit from Amazon. These kits come with everything you need to test the various levels of your pond water. Furthermore, they’ll show what you need to do to balance it out. You won’t have to scratch your head and wonder why everything is green or why the pond smells horrible!
Conclusion
Digging a pond by hand doesn’t have to be as bad as it sounds. If you’re able to spend the time taking it slow and enjoying the process, you’ll have a beautiful, long-lasting pond in no time. Keep a testing kit ready to go at all times.
Here’s a quick rundown of the post:
- Make sure you know the land and the soil before you start digging.
- Choose a shovel or two that you’ll be comfortable using for a long time.
- Testing kits are an essential part of owning a pond.
- Consider using liners and rocks to help with water retention.
Other Helpful Articles
- Can You Dig A Pond With A Front End Loader?
- Step-by-Step: How to Dig a Pond With a Bulldozer
- Can You Dig a Pond in Sandy Soil? 12 Essential Tips
- Can You Use Flex Seal as a Pond Liner?