
For many people, sprinklers are a huge hassle unless you have a lot of experience working on them. Once you have some knowledge in the field, it is actually a pretty simple process to fix and change your own sprinkler systems. But can you add a drip line to an existing sprinkler system?
To add a drip line to an existing sprinkler system, begin by digging out the sprinkler heads. One will then need to be replaced with an adapter to add the 1/2 inch drip line. Be careful when choosing what sprinkler to replace to maintain enough pressure in the system.
What are the specifics needed to create a drip line from an existing sprinkler system? Continue reading to learn more about drip line sprinkler systems and the steps to create one.
Adding a Drip Line to an Existing Sprinkler System.
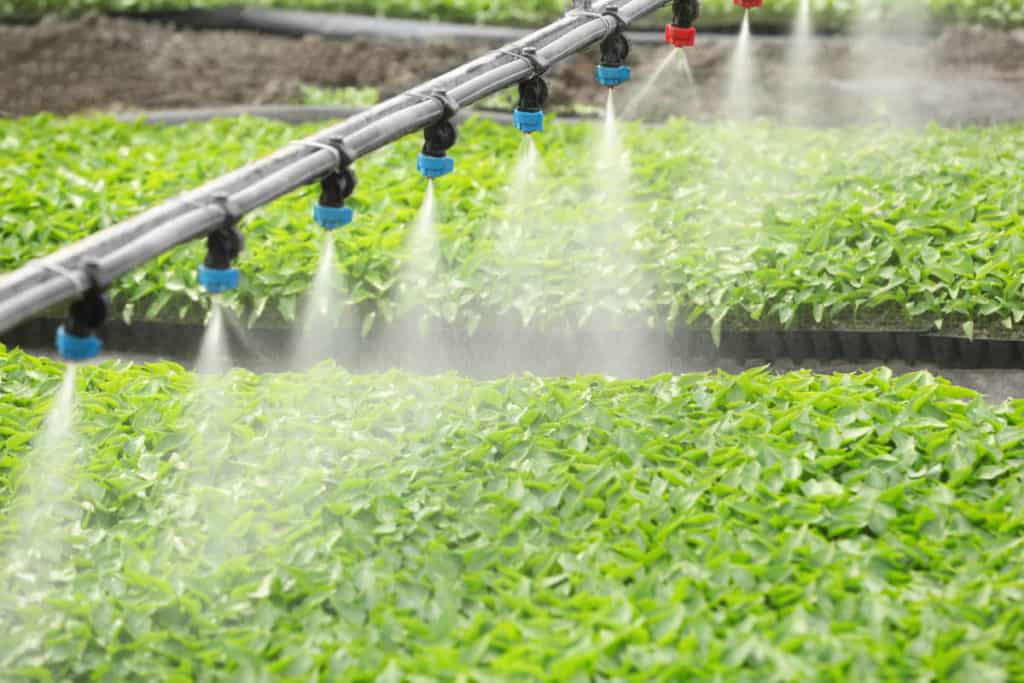
First of all, the best solution is to convert a full sprinkler line to a drip irrigation line. The simple reason is that the sprinkler system needs pressure to work correctly (about 30 psi). A drip irrigation line will also work with almost the same pressure (around 25 psi), but it’s not that crucial if the pressure is lower. There will just drip less water through the little holes in the line. If you extend the existing sprinkler system with a drip irrigation line, it might be that not enough pressure can build up for the remaining sprinklers to work correctly. It is possible in some cases, though.
Here are a few things that you need to do to make sure that everything will still work properly:
- Make sure that you add the drip line to a sprinkler somewhere at the end of the sprinkler line. The longer the sprinkler line, the more pressure will be lost due to the lenght of the tubing. If you add the drip line extension to the beginning of the sprinkler line, you will extend the overall lenght of the system and have more pressure loss at the remaining system.
- Check your general water pressure beforehand. You typically should have somewhere between 30-50 psi. If you have just 30 psi and your sprinkler system is barely working itself, don’t add an additional drip irrigation.
How to Create a Drip Line From and Existing Sprinkler System
There are a few important steps to follow when changing the sprinkler system into a drip line system. While this is a simple process, you will need to make sure that it is done correctly or you run the risk of causing damage to your sprinkler system.
Step One: Locating the Sprinkler Heads
The first step to transforming your sprinkler system into a drip line is to locate the sprinkler heads in your yard. You will need to dig down the earth around each of those sprinkler heads to complete the following step.
Once you have dug up each of the heads and you are sure you have located them all, you will need to decide which sprinkler head to turn into the drip system. This will depend on the location of your sprinklers and the location of the plants you need to be watered by the drip line.
Step Two: Cap Off the Unused Sprinkler Heads
Now that you have chosen the one sprinkler head you will transform into your drip line, you will need to cap off the remaining sprinkler heads. This will prevent any water from emitting from the other heads. To cap off the unused sprinkler heads, you will need a cap that can be screwed in place of the sprinkler head.
One thing to consider is the time of year you’re doing this. If you live in an area where the winter freezes over and you need to blow out your sprinkler system’s pipes, you may want to just cap off the whole line that is not being used. This of course depends on the location of your sprinkler system and the location of the one sprinkler head that will be converted to the drip line.
If you choose to cap off the unused sprinkler heads one by one, install an automatic drain valve, otherwise known as a king drain. When installed properly, these drain valves eliminate the need to blow out your sprinkler system each year. This may be necessary or extremely useful in situations where blowing out the sprinkler systems is not an option, or even in situations where blowing out the system becomes more difficult.
Check out my article on king drains here.
Step Three: Attach The Adapter To The Sprinkler Head
Now that you have capped off the unused sprinkler heads, dig up the one sprinkler head that will be changed and adapted into the sprinkler line. You will want to install an adapter that is half an inch in length. This adapter will allow the sprinkler head to be turned into a drip line.
While installing this conversion adapter to the sprinkler head, ensure that no dirt or debris enters into the open sprinkler head and clogs the system. To prevent this from happening and to ensure nothing entered that will later cause damage to the system, once the adapter is in place, flush the system to remove anything that may have entered.
Ensure that the filter and water pressure regulator are firmly in place. These will ensure the system works the correct way and will stay in good shape. Without a proper pressure regulator, the whole sprinkler system could be damaged. It can also affect how much water the plants get, leaving them drowning or dry.
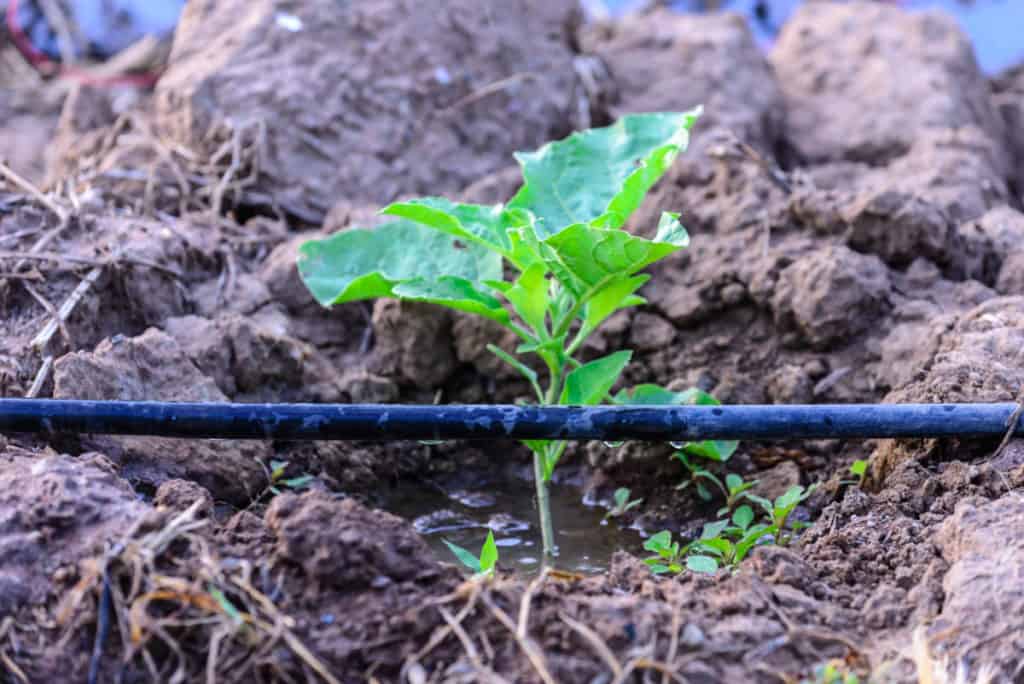
Step Four: Connect the Hose to the Adapter
This hose should be a half-inch in measurement to fit properly onto the sprinkler head transformed into the adapter. A great option for the hose is a polyethylene hose. They are cheap and do not require a lot of extra work once in place. According to a sprinkler contractor I consulted, perforated drip lines should never be used. They are extremely hard to control when it comes to the amount of water released. Polyethylene is a great choice for a hose material.
Once the hose is attached, layout around the plants how you intend it to be. To keep the hose in place, use stakes to keep the hose in the proper position. It is important to consider how far the hose is from the plants that need to be watered. It is also important to consider yard work that will need to be done in the future. You do not want to place the hose where the lawn will be mowed.
Once the hose is in place and the stakes are holding it down, close off the end of the hose. This will prevent all of the water from just leaving the hose through the end, thus drowning the plants located at the end of the hose and drying out all the other plants. Simply cap off the end of the polyethylene hose to ensure the drip line releases water correctly.
Step Five: Install Emitters and Connectors
Install the emitters into the hose where the hose reaches the base of the plants. This can either be done with a hole-punching device or simply by pushing the sharp end of the emitter into the hose. Make sure you wear personal protective gear on your hands while doing this.
Once the emitters are all inserted into the hose near the base of the plants, insert the double barbed connector into the emitter and place it directly at the base of the plant. This helps to regulate the amount of water pressure being emitted out of the large hose into the connector.
Sources
City of American Canyon, Outback LandScaping