
Sprinkler valves, also known as valve boxes, are an essential component for many sprinkler systems. They operate via an electrical current that allows the system to control how much water goes through and when it turns on. Unfortunately, many homeowners have had to deal with soaked, ruined boxes.
Sprinkler valves can get wet as long as the box has an intact O-ring. The rubber insert is designed to prevent moisture from getting inside. Keep the O-ring lubricated to prevent it from getting cracked. A broken ring will allow moisture inside, ruining the valves due to a broken electrical current.
Throughout this article, you’ll also learn the following info about sprinkler valves and excess moisture:
- Several factors that can contribute to a flooded valve box
- How you can repair it without an issue
- Preventative tips and tricks to keep the valves dry
What to Know About Wet Sprinkler Valves
It might sound silly to think that a sprinkler valve shouldn’t get wet. After all, its whole function is to bring hydration to the surrounding soil. However, too much water can ruin the valves, causing your sprinkler system to malfunction or break. There are three things that you need to know about a valve setup before you start to worry.
Consider the following bits of information:
Frozen water can break the valve box

Sprinkler Master Repair mentions that freezing temperatures can spell the end of your sprinkler valve. When water makes its way into the box and freezes, it can crack the structure, internal components, and O-rings. Any of these three pieces breaking will lead to leaks and possibly irreparable damage down the road.
Sprinkler valves are designed to get wet
Fortunately, most companies realize that sprinklers are bound to get wet. They designed the valve boxes with many layers of protection, including O-rings, lubrication, and tough outdoor weather-resistant shells. A little bit of moisture won’t cause any harm as long as it doesn’t penetrate the box or freeze.
High-end systems have multiple safety features
Another good thing is that most high-quality valve boxes have several additional features that are designed to protect the internal components. On top of the three aforementioned safety precautions, a high-end system could include a temperature controller or a fuse that trips when it gets wet. The tripped fuse would prevent electrical damage, saving the valve box.
Now that you know the basic design of sprinkler valves, it’s time to dive into the repair process. Sadly, not every house comes equipped with a top-notch system. You might have to repair it or replace various internal components. If you want to know how to get either of those tasks completed, proceed to the next section.
How to Fix a Leaky Valve
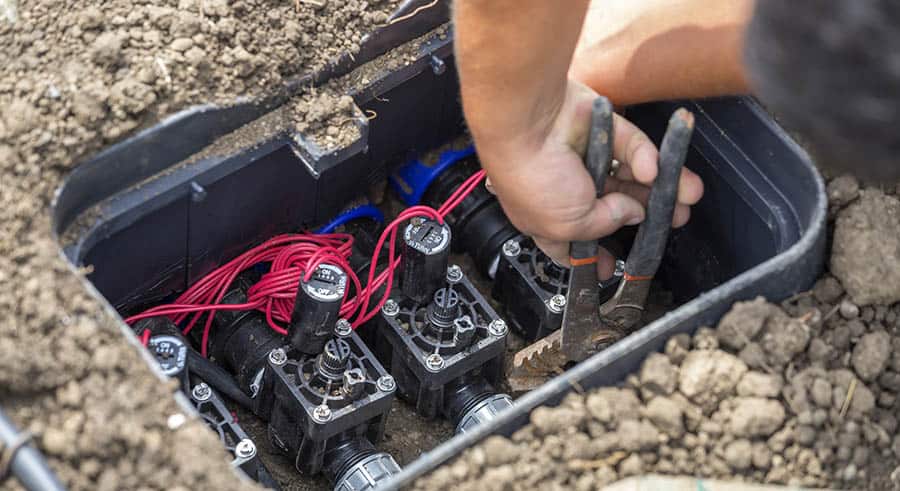
In most cases, a leaky valve isn’t the end of your sprinkler valve box. You can repair it in a handful of steps. There are a couple of scenarios in which you wouldn’t be able to fix it without getting a new system, but they’re few and far between. Luckily, you’re able to learn the easiest solution to repair a leaky valve box.
Follow this step-by-step process:
- Turn off the sprinkler system and the circuit breaker. Before you start working on the valve box, it’s important that you follow the necessary safety suggestions. Failure to abide by this step can result in an electric shock or a surge that ruins the valve box beyond repair.
- Remove the screws and set them aside. If they’re stripped or rusted, now is a perfect time to replace them with brand-new screws. No matter what you do, never use screw glue to secure them in place. You’ll end up making it impossible to remove them when it’s time to fix or replace an O-ring.
- Take out the old O-ring and inspect the system for cracks. The O-ring will be lined along the inside of the valve. Take it out and ensure that you get an O-ring that’s exactly the same as it. You can’t use any other thickness or shape since it won’t hold a tight seal. Look around the valve box, valves, and rings for cracks for holes.
- Insert a new O-ring and add lubrication. The Lawnsite community points to the importance of switching out the O-ring whenever there are signs of wear and tear. Something as little as a 1/16-inch crack can cause severe leaks. Replace the O-ring and don’t forget to use a lubricant to wick away excess moisture.
- Seal the valve box and turn on the breaker. Once you’ve replaced the O-ring, it’s time to put the lid back on and drill the screws back in place. Ensure that you tighten them enough, but don’t overdo it. It’s recommended that you use a screwdriver instead of a drill so you don’t crack the valve.
As you can see, the repair process is fairly simple. You don’t need fancy tools or loads of money to get the water away. When you have the valve box opened, dry out all of the moisture, let it sit for a few minutes, and then proceed with the steps. There’s no point in fixing everything if you don’t remove the water.
Preventing Water from Getting Inside
If you’re tired of repairing your valves and buying new expensive hardware all the time, then you’ve come to the right place. Below, you’ll find some tips and tricks to prevent water from getting inside. A little bit of hard work can go a long way with a sprinkler system.
- Add lubricant regularly. Depending on where you live, the climate can impact how quickly the O-rings dry out. If you live in a dry area, then you’ll have to reapply it every few weeks.
You can get a good Silicone Lubricant here on Amazon
- Inspect the O-ring once per month. Try to stick to a specific day so you can add it to your calendar. This simple process can make a huge difference in the longevity of your sprinkler valve since it will allow you to stop leaks before they get worse.
- Consider building a protective barrier. You can cut out a plastic ABS box and put it over the sprinkler valve to prevent rain and snow from building up. It’ll also add a bit of insulation to cut back on the freezing temperatures.
- Never let water pool around the valve box. If there’s too much water on the valve, it’ll eat away at the lubricant and expose the O-ring to dry air. Furthermore, it increases the chances of the box getting frozen. Less water means less ice, which saves the valves and internal components from cracks.
- Replace the valve box if you notice any cracks. Although it might cost a bit of money, you shouldn’t let a cracked valve go unfixed. The alternative is that it allows water to get inside, shutting down the system and causing you to spend more time and money than you would’ve had to if you’d replaced it. Consider using epoxy to fill small cracks.
Conclusion
Sprinkler valves are made to encounter water, but like any electrical component, they have their fair share of issues. Keep moisture out of the valve box with a new O-ring and lubricant throughout the year. Also, don’t forget to remove excess water to prevent the valve from freezing in cold weather.
Here’s a quick recap of the post:
- Sprinkler valves need to have an O-ring to prevent moisture from getting inside.
- You can repair a leaky valve in a few minutes, unless its electrical components are damaged.
- Maintain and inspect the valve box regularly, preferably once per month.