
Whether you have a riding or pushing mower, it does the hard work for you. As winter approaches, it’s the ideal time to prepare your mower for storage before it gets too cold. Like you would do to your car or boat, the same care should also be dedicated to a lawnmower.
When storing a lawn mower, it is important that you keep it in a cool, dry place after cleaning it. Check for damaged parts and lubricate where needed. In addition, ensure that you drain the engine oil and replace it, and charge the battery and store it in a cool, dry place.
Mowers are expensive, in addition to regular maintenance during spring, you need to take steps on how to store it when winter comes. This guide provides both dos and don’ts in a detailed, step-by-step procedure in the storage process.
DO: Read the Owner’s Manual
Operating, maintaining, or repairing lawn equipment is not a simple task. That’s why manufacturers accompany the package with the owner’s manual. This enables you to follow instructions to the latter on how to use and maintain the mower. You will also be provided with safety instructions.
Statistics show that about 69 people die due to lawnmower incidents, while more than 250,000 individuals sustain lawn mower injuries per annum. That’s why reading instructions is imperative. You’ll understand the maintenance measures, how to store it, and other safety tips.
For instance, always wear gloves during repair and maintenance work. The spark plug wire should also be removed to avoid accidental starting.
DON’T: Skip Instructions
A lawnmower comes with instructions stating how you should assemble, disassemble, operate, maintain, and store the equipment. Avoiding to read instructions will only put you in potential danger. Do you know that a lawnmower should be kept in a cool, dry place? This is one of the items you’ll find in the owner’s manual.
DO: Remove, Sharpen and Inspect the Blade
Winter is here, but that doesn’t mean you should not take care of your lawn blade. A sharp blade will not only cut the grass clean, but it will also reduce your lawn mowing time. Sharpening the blade is simple that even a novice can handle. You only need to master a few sharpening skills.
When you’re sharpening it, remove the spark plug, but do it carefully. The video below shows a detailed process:
If the piston is on the top of the compression stroke, avoid bumping the blade it might get into the power stroke. This can even break your hand.
Sharpening the blade will ensure that the grass is trimmed well and faster. A blunt blade is also bad for the health of your lawn. Before you store the mower, inspect to determine if you should sharpen or replace it.
For sharpening:
- Start from the top to give you a durable edge on the blade.
- Ensure you don’t sharpen to razor-sharp as it will make the blade get blunt more quickly. Instead, a butter knife sharpening will do the trick.
- Check if the blades have cracks, or they’re extremely thin, or bends, or holes. If they have any of these issues, it means you need to replace them. However, if the blades still have plenty of meat left and in their correct shape, you simply need to sharpen them.
Alternatively, you can get help from a professional. Drop the lawnmower off at a mower shop and let the equipment get a once cover, which will make the mower stay in good shape until winter is over.
DON’T – Fail to Sharpen the Blade
This is a mistake one by most equipment owners. Just because winter has knocked in, it doesn’t mean the blades shouldn’t get sharpened. Don’t wait for too long until springtime. If the blade blunts, it might not cut grass as expected. It will be too dull with rust. You might end up replacing it, which is a costly affair. Therefore, keep the blade sharp and clean as usual.
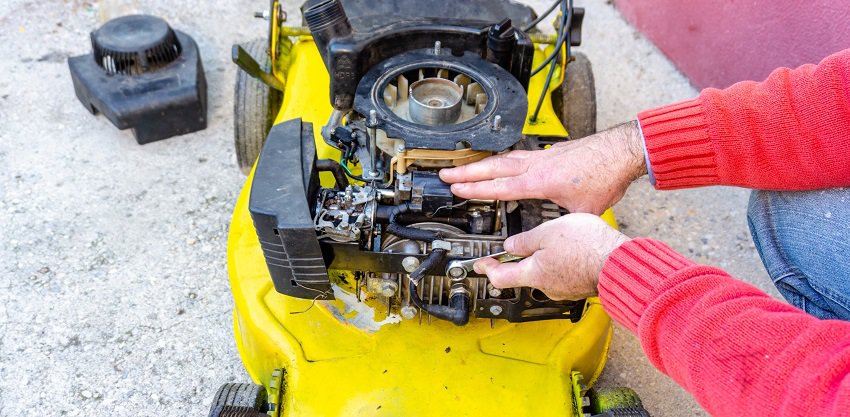
DO: Clean the Mower Before Storing It
Cleaning the mower will ensure you use it for long. It will also ensure you don’t struggle to get the equipment work efficiently at the beginning of every season. Always keep in mind that small pieces of debris and grass can accumulate between small spaces of the engine. This can lead to engine damage, overheating, or prevent you from having full control of its speed.
Start by cleaning the deck of the lawnmower. The deck is an enclosed housing where blades spin. It’s a hidden part with no aesthetic reason to clean it. However, it boosts the performance of your lawnmower.
When dried grass and debris stick there, it might hinder the efficient cutting of grass. Cleaning the deck has nothing to be neat. It minimizes the spread of lawn diseases. Ensure you clean this part at the end of every season. It’s unpleasant and unhygienic to leave the mower with dirt.
Luckily, you don’t need special skills to clean the deck. Use a garden hose with hot water and soap. Get a good brush to remove even the tiniest debris.
The next cleaning part is the engine.
- First, remove the spark plug to avoid accidentally starting the engine.
- Remove the screen and then detach the blower housing.
- Use an engine degreaser and a garden hose reel. You only need a degreaser, cold water, and a brush to clean the unit thoroughly.
- Avoid using compressed air to clean your machine to avoid forcing tiny pieces of debris into the engine’s inaccessible places.
- Ensure the engine is cold before you wash it and replace the corroded plugs.
- Clean the radiator cooling fins, the blower housing, and the flywheel fins. The simplest way of doing this is by spraying strong jet water, probably using a garden hose.
- Remember to clean the throttle linkages, choke, and terminals.
A clogged or corroded carburetor will disable the unit performance. If the unit is dirty, clean it before storing it, but if you notice any signs of corrosion, replace it. And remember, the carburetor needs to be completely dry before reassembling.
Cleaning your lawn mower before storing it will enable the unit to last for years. It will also be ready to cut the grass at the start of the season.
DON’T: Leave the Lawnmower With Dirt
Debris and grass accumulation near components need to be cleaned before storing the unit. Debris builds up in the undercarriage can cause issues next spring.
DO: Drain and Replace Engine Oil
Motor oil is a crucial requirement of all engines for sealing, lubrication, and corrosion inhibition. Your lawn mower engine is no exception. The oil inside the unit will get dirty over time, and as the season comes to an end, you need to drain the oil and replace it. Soot and metal particles can cause engine wear. Therefore, it’s a good policy to change the oil to prevent irreplaceable engine wear and tear.
Ensure you don’t run the unit in an enclosed space. The exhaust fumes contain carbon monoxide gas, which is colorless, tasteless, and odorless yet poisonous. In case you’re operating it in a workshop or garage, ensure the space is well-ventilated with windows and doors open. Remove the spark plug to ensure the engine won’t fire once you turn the blade. Another safety measure is to keep gas away.
To drain the oil:
- Ensure you get a suitable location. It can be your garage floor or on a driveway.
- Cover the surface with a plastic sheet, old newspapers, or a trash bag to collect any spills or drips. It’s a way of avoiding the mess.
- Run the engine to warm up the oil. It makes the oil more fluid and less viscous to make it drain quickly. Don’t run it for more than 5 minutes as the oil might scald your hands while draining.
- Detach the spark plug from the engine to avoid it from starting. You may decide whether to drain through the oil fill or plug.
- If you choose the plug, place the unit on its side and ensure the carburetor side is the uppermost. This prevents the oil from leaking via a breather.
- Locate the drain plug and loosen it, but don’t entirely remove it. Then turn your lawnmower and drain the oil.
- Once you’re done, add the new recommended type and the right amount of engine oil.
- Ensure you check the manual instructions on how to change the engine oil, the dos and don’ts, and the safety measures to follow.
DON’T: Forget to Change the Oil
This is one of the common faults people overlook. When winter kicks in, people assume storing the lawnmower is just enough, expecting it to work efficiently in the next season. The grimy, used oil must be changed. It’s not a waste of fuel; it will save you some bucks in the future. The contaminated oil will damage the engine.
DO: Get Quality Fuel
Fuel is the propeller that makes your lawnmower function effectively. It boosts engine performance and determines its durability. However, you should adhere to the first rule of engine safety; fuel is extremely explosive and flammable. Always handle it with extreme care. Fuel for your lawnmower must have the following requirements:
- A minimum of 67 octane
- Clean, unleaded, and fresh
- Gasoline with about 15% methyl tertiary butyl ether or 10% ethanol is acceptable
- You can also use canned fuel products
If you operate in a high-altitude climate, approximately 5000 feet and above, a minimum of 85% octane gasoline is acceptable. Gas will get stale if you’re storing the mower for more than a month. Stale fuel leads to engine damage from gum and acid deposits forming in the carburetor or fuel system. If any of these damages happen, the engine warranty will become void.
With proper fuel treatment, you don’t need to costly drain the it from the engine for storing the unit safely. What you need to do is:
- Read the given instructions on fuel treatment.
- Once you add fuel, run the engine for about 5 minutes to circulate the stabilizer evenly through the fuel system.
- Make sure you store your equipment dry and clean.
If the fuel is untreated with a fuel stabilizer, drain it into an approved container, then run the engine until the fuel is over. Use the stabilizer to maintain freshness until the spring season knocks the door.
DON’T: Use an Unapproved Fuel Type
The engine is the heart of your lawnmower, while the fuel is the “blood” needed to operate the unit. Avoid using unapproved products such as E85 ethanol-gasoline. This will cause irreparable damages to your engine when the mowing season begins.
DO: Replace Spark Plug Before Storing the Lawn Mower
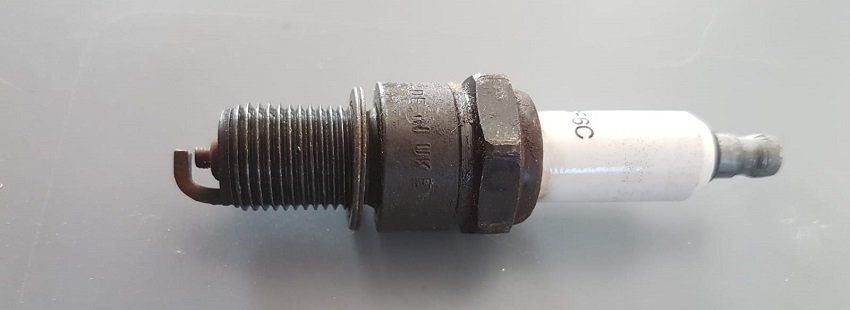
Lawnmowers are usually fitted with lethal blades that spin while cutting grass as long as there is a spark plug that combust the fuel. If the spark plug is corroded and overworked, it will probably not fire up properly come next season. This is the time to replace it and get your unit prepared to cut grass after the winter.
So, how do you know that the spark plug needs replacement? If you hear rattling, noises, or pinging, it means the engine is knocking. This will make you use more fuel than average, which will cost you money. If you notice such issues, ensure you replace the part before storing the lawnmower.
To replace it:
- Ensure the engine is cool.
- Then clean the debris on the wires and make sure the metal is rust-free.
- With a spark plug wrench, lightly unscrew and remove the spark. You can use a bit of WD40 style lubricant that might help. Using the right plug wrench will also play a significant role. A plug gauge is used in measuring a gap between the electrodes.
- Using your hands, screw the plugin gently.
- Finalize its position with a robust and firm turn.
DON’T: Leave the Spark Plug Dirty
A dirty plug can lead to a myriad of issues:
- The engine will hardly start. If you have a push mower, it’ll need several pulls before it starts.
- It will also lead to poor engine performance. The engine might run for a while and then stop functioning.
- A bad spark plug may also lead to misfires.
- You’ll also notice excessive fuel consumption.
- With a poor spark, gasoline burns inefficiently. Thus, it leads to increased fuel consumption. Therefore, any damage requires a replacement.
Make sure you don’t start another season with a troubled engine. It will cost you effort and money.
DO: Recharge the Battery
One of the most crucial parts of a lawnmower(riding) is the battery. You need to ensure that it is charged or the energy remains, especially when you know you’ll store it for quite some time.
Some instances might warrant you to replace the battery like losing charge fast or hearing a clicking sound. But before doing so, you might consider options like recharging it.
Practically, a battery normally charges at a rate of 10 amps. So, depending on the amps, you can figure out how long you should charge it. The last thing you would want at the start of a new season is a battery that won’t start the unit.
For a riding mower, you’ll find the battery under the seat. If not, you can read the user’s manual to get more information.
- With a pair of pliers, disconnect the negative and positive cables and place the charger close to the outlet.
- Attach the red lead to the positive terminal, and the black lead to the negative terminal.
- Most importantly, ensure you know the voltage of the battery.
- Allow the battery to charge for the right amount of time, as instructed in the manual. In most cases, batteries take about 4-8 hours for a full charge. This will also prevent battery damage or explosion.
You can extend the battery life by charging it to the full capacity, especially when you’re about to store it for an extended period. And remember it can be hazardous to start-jump a battery. Ensure you have eye protection gears and gloves to prevent injuries.
Always charge the battery in a ventilated area, away from anything flammable. Lead-acid batteries tend to release gas while they charge.
The best thing is to follow the manufacturer’s user manual. You’ll get proper advice based on the different products based on the specific battery use and chemistry.
Always choose quality batteries and chargers, engineered to work perfectly with your equipment. Once you disconnect the battery, store it away from metal items such as coins, nails, keys, and screws. These items may connect the negative and positive terminals and short the battery out. Once you remove and recharge the battery, ensure you store it in a dry, clean, and well-ventilated space.
DON’T: Charge Battery in a Wet Location
Undoubtedly, recharging the battery will extend its lifespan. The mower will be ready to tackle the next season effectively. However, you should take precautions as you handle the task. Don’t throw it in the trash. Follow the regulations and recycle your battery at a recycling center if need be.
Don’t wait until it knocks out to recharge it since you shouldn’t charge it in extreme cold or hot temperatures. By doing so, you’ll be cutting short its lifespan. Most importantly, never charge a battery in a wet or damp location. You need to do this in a dry, clean, and well-aerated room. If possible, do it outdoors.
DO: Check for Damaged Parts
You have now cleaned your lawnmower, changed the oil, and recharged the battery, but you still have one more task to handle before storing your unit. It’s time to inspect your equipment thoroughly. Check if every piece is intact. Replace or repair the damaged parts as required.
Do away with bent or warped blades to prevent prematurely-worn bearings and other irreparable issues. Troubleshoot any problems to ensure the mower won’t have performance hitches when winter is over.
Tighten all loose belts and replace the cracked and worn out pieces.
DO: Lubricate Essential Parts
Lubrication prevents wearing out of various parts of a lawnmower, starting with the engine. Greasing is crucial as it prevents abrasions, adds waterproofing resistance, and provides corrosion protection.
However, it’s essential to choose the right grease. Some products contain lithium, which might contain molybdenum disulfide.
Grease every fitting after changing the oil. With an adaptable hose, you’ll be able to reach the fittings easily, fast, and effectively. Again, refer to the owner’s manual to help you further.
- Start the greasing process by turning the grease gun to unscrew it.
- When greasing the lawnmower, place the machine on a solid, flat surface.
- Turn off the ignition and allow the device to cool down completely.
- Then, lower the deck to its lowest setting to enable you to access the grease fittings easily.
- Make sure you grease the front axle and the cutting spindles.
- Remove any debris, dust, or grease with a cloth, and then insert the gun’s tip over the Zerk to reach the fittings.
- You’re also required to grease the front axle pivot. This part can be difficult to reach unless you’re on your back, under the mower.
- Lubricate the deck left pedal, which is at the base of the lawn mower’s deck lift panel.
- Use at least two pump greases until grease squirts from this fitting. This is a piece of general information. But you might find extra information on the owner’s manual. You should lubricate all parts at the same time before you store the device. Do this regularly to keep the mower in good shape by preventing corrosion and wear and tear.
DON’T: Just Use Any Grease
You cannot use any oil to grease the mower’s fittings. Get to know the recommended ratio and master how to mix the gas and oil thoroughly. By doing this, the lawnmower will be ready to tackle the overgrown grass that comes during the mowing season.
DO: Store the Equipment in Dry and Clean Spaces

A lawnmower is a significant investment, and keeping it safe will keep it in good shape. The last thing you’d want to deal with is a broken or faulty mower on a hot summer’s day. After ensuring all parts are in order, it’s time to choose the right place to store it until winter is over.
Consider storing the device in the basement. However, storing a lawnmower with a full gas tank in the house can be dangerous. The tank releases deadly fumes, which can spark a fire. This is why the gas tank should be empty. Run the equipment before storing it. This is not recommendable for long-term storage. However, you will not encounter this problem with an electric mower.
Some homeowners may decide to keep the machine outside. If you have a large property that is unlikely to attract unwanted visitors, it may be an okay option. However, the lawnmower will be susceptible to theft and other elements. It means you may pay more for replacements and repairs in the long-run.
If this is your only viable option, invest in a cloth tarp to pests and moisture away. It will also protect your family from getting tangled in the mower or from sharp edges.
The garage is also another safe place to store your lawnmower during the winter season. But most homeowners use garages for cars and other uses. More so, garages tend to get damp. Therefore, you need to buy a quality cover unit for your mower to keep all elements dry and protected.
Alternatively, you can buy a high-quality plastic lawnmower box. A lawnmower storage container is designed to fit perfectly, including a few elements. More so, they take a small amount of space. For extra security, you can add a tarp cloth to prevent moisture leaking. With a storage box, your lawnmower is safe from pests.
You can also store your lawnmower in a storage shed. This is an excellent option for any climate. It keeps your machine away from the basement or garage, which might not be ideal for storing a lawn mower. Storage sheds come in different sizes and styles. They are also designed to suit a myriad of needs and budgets. A well-built storage shed gives you peace of mind, knowing your machine is safe and away from theft and pests.
More so, a shed offers a lifetime storage option. It’s highly customized to suit your needs. Although it might cost more upfront, it will save you some bucks in the future.
Important: If you plan to store your Lawnmower outside, check out my in-depth guide with helpful tips.
Conclusion
Preparing the lawn mower for the winter season can be demanding, but worth it.
- Always follow the owner’s manual and adhere to safety measures.
- Consider getting professional help where you’re not sure of what to do.
- Visit a local shop for professional advice, especially when changing oil, recharging, or replacing the battery.
This is to ensure you and your family are safe from any hazards that a lawn mower might cause.
But if you follow the above dos and avoid the don’ts, your machine will stay in good shape and ready for the next mowing season.