
Can you water a hillside garden successfully with an uphill drip irrigation system? This is a compelling issue for many gardeners who have a sun exposed garden area on a hill, and worry about making sure that their plants are receiving enough water.
It’s easy for water to just roll down a hill, not soaking in where it is needed, and puddle at the very bottom, making a muddy mess and wasting precious water. So, how can a conscientious gardener avoid this consequence and ensure that their hilly garden receives enough moisture? We are going to explore this challenge and offer solutions.
It is indeed possible to irrigate a hillside area successfully with drip irrigation. To be able to water a hillside area, it takes some creative ideas and some special equipment like pressure emitters, but it can be done using a drip irrigation system!
Why would someone plant a garden on a hillside? Hills are part of the natural terrain of many global geographies. Sometimes, it’s the only land around which you can garden. After all, if you live in the mountains, your options are limited!
Other times, planting a garden on a hill offers a unique opportunity to showcase specific flowers and plants in a way that everyone passing by can admire.
Regardless of your reason for it, many people have gardens on hillsides, and they need to learn techniques to keep their beloved cultivated areas well irrigated.
Today, gardeners are especially sensitive to the pressures of water conservation. Gardens need to be watered, but it’s important to find a way to do it that doesn’t waste excess water. This challenge is especially evident when watering on a hill.
Drip irrigation is one way of watering gardens that offers a solution to the concern of water waste. It also provides a solution to possible land erosion from overwatering the surface of a hill.
This Is How To Irrigate A Hillside
When considering how to irrigate a hillside, the first thing that often occurs to people is the challenge of having the water soak in. If the land is especially compacted, water can roll quickly down the surface of the garden and not soak in where it is needed. Not only do the plants lose the opportunity to have water reach their roots, water is wasted. This challenge makes the usual method of employing a basic sprinkler often ineffective on a hill.
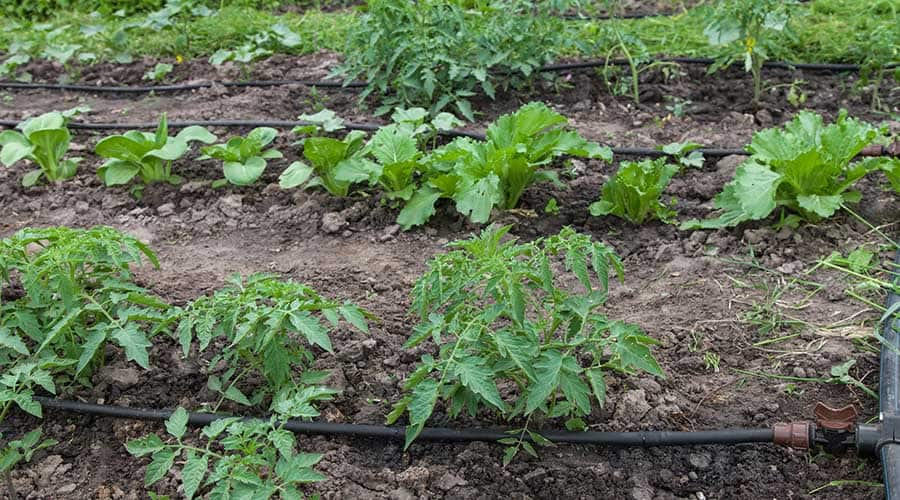
One very effective method to use when irrigating a hillside is to use a soaker hose in an extremely basic version of the popular drip irrigation technique.
Soaker hoses of varying lengths can be easily purchased at any garden center or hardware store. However, you can also use a regular hose, and punch small holes in it, about an inch apart. Then seal one end so that the water doesn’t escape, except through the holes.
Place the hose in the center of the area that you wish to irrigate, and turn the water on. The water will slowly seep out of the holes in the hose into the area you wish to water.
Due to the slow speed at which the water is being spilled, it should soak into the ground, and not roll down the hill. This will ensure that the plants in the area receive adequate water to their root systems and remain healthy. This will also prevent the water from washing down the hill, taking some of the soil with it and causing surface soil erosion.
Specialty Pressure Emitters
A specialty pressure emitter is a sprinkler head with a built in pressure regulating device. This emitter is often used in more complex hillside drip irrigation scenarios because it can maintain a constant water pressure, even when dealing with the challenges presented by running water up and down a hillside.
Pressure emitters can be purchased in a variety of different sizes, so that you can customize your irrigation system to the flow rate and water pressure of your water source. You can get some here on Amazon or in your local Walmart.
With the emitter attached to the water source, water pressure is kept even, preventing any misting or fogging that happens with water under high pressure. The emitter also prevents water waste, ensuring that the water soaks down to the plant roots and provides needed hydration.
Finally, using a specialty pressure emitter will also prevent land erosion from too much water being poured onto the hillside at once and not being absorbed.
A specialty pressure emitter is going to do a far better job watering a hillside garden than a basic sprinkler attached to a hose could ever hope to accomplish!
Drip Irrigation Guidelines
A drip irrigation system installation requires careful and informed planning. There is no one size fits all version of this system for your hillside garden.
Take a thorough inventory of your garden and the land upon which it sits. How big of an area do you need to water? What is the slope of the hillside? What type of soil is present in the area? How much sun does the area receive? Are there areas of shade? What kinds of plants are present?
Another aspect of your planning for a drip irrigation system is to examine the flow rate and water pressure of your water source. These numbers will dictate what type of parts you need for the entire system, especially the water emitters. Don’t be afraid to ask for help from people who have done this kind of installation before! You want to get it right the first time.
Six Steps To Planning A Proper Irrigation System
Measure Everything Twice
As the old adage says, measure twice, cut once. Installation of an irrigation system is a complex effort with a lot of custom cutting and ordering of pieces like specialty pressure emitters. You don’t want to be guessing on a number, and then have to go back and do it again later!
Measure the land (or have it surveyed if it’s a large area). Measure the garden. Determine the water pressure and flow rate in your water source. Consider how densely the plants are spread in the area. You’ll be glad you did.
Research And Plan
I know, it’s tempting to just launch into the hands on effort of installing the irrigation system, but again, this is a complex process. Read online sources. Talk to your fellow gardeners. Ask for your neighbour’s advice. Check books out from your local library.
Learn from the mistakes of people who have done this before. Then, write and draw your plan out so that you have something you can easily refer back to and revise if needed.
There are a lot of parts involved in an irrigation system. Better to know where they all need to go before you start.
Consider The Possibility Of Vandalism
Is the area where you want to install the irrigation system one where people frequently walk by? Is it in a public, high traffic area? Sadly, potential vandalism is something that has to be considered when planning an irrigation system.
Depending on the likelihood of vandalism, you can then decide if the system will be visible, or mainly underground. It’s also possible to run parts of the system under the leaves of large plants or garden statues to hide them if needed.
Determine Your “Base” Plant
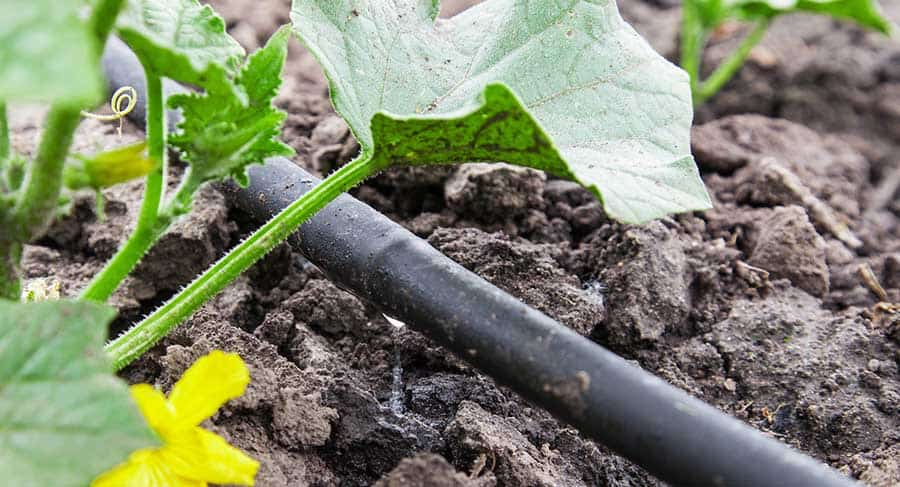
Figure out which one of your plants in your hillside garden needs the least amount of water. Test the irrigation system with this one plant only, and see how long it takes to provide it with the right amount of water to meet its needs.
That time measurement will be the length of time that your entire irrigation system operates at one time, since you won’t want more water at your “base” plant than it needs. That would lead to water waste and overwatering. Now you can work back from this time limitation to calculate the watering needs of all of your other plants.
Determine The Needs Of The Other Plants
Once you know how long it takes for the irrigation system to water the “base” plant, you can work to determine the flow rate and the pressure emitters needed for your other plants to be fully watered within that same time constraint.
Since the other plants will need more water than the “base” plant during that same watering opportunity, they will have to have a pressure emitter installed nearby that dispenses more water to them in the same time frame.
Layout Your System
Once you have all of the basic water needs of your garden plants identified, you can perform your final calculations to ensure that there is enough water flow and pressure from your water source throughout your irrigation system. Then you can obtain the lengths of tubing or PVC pipe needed.
You will also need the right number of emission devices that are suitable for different areas of your garden. Lay everything out and begin the installation!