
Did you know that with under $200, you can keep your outdoor garden effectively watered all-year-round without having to worry about spending the extra time and energy to water the plants? With a drip irrigation system, that wish could be a reality for you sooner than you imagine.
To make cheap drip irrigation under $200, you’ll need to sketch the plan for the system, buy drip irrigation equipment, connect to your water supply, install a water filtration system, connect a pressure regulator, connect the drip line tubing, connect the emitters, and run and maintain the system.
This article will comprehensively explain how you can cost-effectively set up a drip irrigation system that will save you time and water. Read on.
The Unique Benefits You’ll Experience With Drip Irrigation
Drip irrigation will come in handy whether you want to water potted plants, vegetable gardens, and greenhouses, house plants or flower beds and lawns for the following reasons:
- Saves time by eliminating the cumbersome task of watering the plants.
- With an automatic drip irrigation set-up, irrigation is continuous and automated even when you are away. It offers continuous water flow during the dry periods of the year when rainfall is insufficient for your plant’s growth and development.
- Plants are stronger and healthier as the watering is regular and controlled to meet the unique watering needs of the plant.
- Saves up to 70% of water as the drip irrigation system delivers water only to the root zone of the plant, unlike other irrigation methods that deliver the water in a less targeted manner. Most of the water is lost to evaporation and run-off in other irrigation methods.
- Reduces plant diseases caused by overwatering of plants.
- Reduced cost of chemicals and fertilizer as you can add fertilizer or pesticides that are water-soluble more evenly and consistently through the irrigation’s piping system.
- It’s energy-saving as the drip irrigation system works on relatively lower pressure and low water volumes.
- Better weed control as weed growth is reduced due to the localized wetting of soils. This is unlike other irrigation methods characterized by indiscriminate wetting of surfaces resulting in run-off and providing water that supports weeds.
- Inexpensive and easy to install and design.
- Better use of uneven terrain; can be implemented on almost any terrain, soil type, or crop but is most suited for row crops.
- Those farming food crops on outdoor gardens get improved yield, quality, and uniformity.
- Decreased field-labor cost.
- Environment friendly as soil erosion by run-off and percolation of chemicals, fertilizers, and salts is tremendously reduced.
Understanding How the Drip Irrigation System Works
Localized irrigation, trickle irrigation, and micro-irrigation are alternative terms that refer to the drip irrigation system. It’s the same process of slowly applying water in the form of drops close to the plant that they are referring to.
Components of a Drip Irrigation Scheme

Timers
You can program your time to automatically initiate and stop watering at set times. This offers convenience and consistency in watering your plants since you can be away at work or on vacation, while your crops get watered nonetheless. The timer is attached to the water supply end of the irrigation system.
Timers are available in a wide range depending on your power source; AC, battery, solar, and windup timers are all available. For $45, you can have a battery-driven Galcon Bluetooth LCD timer. That can last an irrigation season.
Pressure Reducer for High Mains Water Pressure
Lowers incoming water pressure proportionately to the drip irrigation system’s required pressure levels. A drip irrigation functions at very low pressure as water is delivered in drops through the emitters. A pressure level of 25-30 psi is ideal.
Main Tubes (½ inch) and Connectors
The main tubes are the main pipes that transmit and distribute the water. The main pipe is flexible and can be manipulated by cutting or extending as desired for your irrigation plan.
The main tubes change direction or bench into smaller feeding tubes through main tube connectors. These can connect tubes with a coupling connector, or L connector or T connector.
Feeding Tubes (¼ inch) and Connectors
The feeding tubes branch from the main tubes conveying water to the drippers and sprinklers where the system terminates. The connectors are used to change the direction of the feeding tubes or extend them
A single circuit of feeding tubes of ¼ inch diameter can only go up to a maximum length of 50 ft.
Drippers, Shrubblers, and Micro-Sprinklers
Drippers drip water around the roots of your plants. They are adjustable based on the amount of water needed that is, in turn, dictated by the plant’s needs and the soil type (for example, clay soils need less water compared with sandy soils that have lower retention capability).
- A shrubbler is designed for localized irrigation and discharges large sprays of water from a drip up to 40 liters per hour. It can serve large plant bases very well.
- Micro-sprinklers spray large areas with fine droplets of water. They can sprinkle in positions of 90°, 180°, and 360°.
Support Stakes
Hose support stakes they raise and hold the tubing for stability and protect plants from the raised tubes.
Micro-sprinkler support stakes elevate the sprinklers above the ground to broaden the sprinkling range.
End Stoppers and Hole Plugs
End stoppers and hole plugs stop the flow of water at the end of the feeding tubes but may also be used to seal unneeded holes on the main tube.
Control Valves
Control valves allow water to flow one way into the pipe distribution network and closes to stop any backward flow when the pump is shut down. It is important as it stops water that may contain dissolved fertilizers or pesticides from flowing in the reverse direction and risks polluting your domestic water supply.
Threaded Tap Connector
Allow for direct connection of ½ in main tubes or ¼ in feeding tubes to ¾ in (20-27mm) tap threads.
Preliminary Steps Before Setting Up Your Drip Irrigation System
Here are the steps to setting up your drip irrigation system on a budget:
- Check the prevailing legal requirement. Get the required compliance paperwork where necessary.
- Acquire the knowledge you require to design, install, and run a drip irrigation system.
- Check out your budget so that you can purchase the kit commensurate with your budget, and whether you can afford some add-ons, such as a timer, that are not essential for the functioning of your system but deliver added convenience.
- Get an irrigation dealer knowledgeable on drip irrigation who can offer hands-on technical support whenever needed.
- Establish a watering plan considering the location of your plants and the amount of piping you will require.
- Then, check out your terrain to ascertain the water pressure levels you’ll need. Plants up higher the terrain, such as on hills, will need more water pressure.
- Consider buying a timer to ensure plants are watered consistently and systematically throughout the growing season.
- After that, contemplate if you might need more tubing when your plants grow bigger.
- After that, be careful to follow the manufacturer’s instruction manuals to set up your drip irrigation system.
- Finally, have a proper maintenance plan in place for your system. For instance, an appropriate maintenance practice that will improve your system performance is to soak your emitters in water and vinegar annually to prevent a buildup of calcium and magnesium that can lead to clogging.
Watch this Youtube video on how to set up your drip irrigation:
Sketch the Plan for the Drip Irrigation Scheme
We’ll be setting up a Hose Faucet Timer drip irrigation system, which uses a timer to control the amount of water your plants will receive and how often. It’s remarkably simple to set up and program, and the timer will go a long way in controlling your water costs.
This involves drawing up a sketch map of your tubing route through the area that you wish to irrigate.
You may want to run a pilot program over a small portion of the garden to familiarize yourself with this system if you’re unconversant with drip irrigation. You can opt to run the program over one or two flowerbeds and take note of the outcome.
After choosing an appropriate watering device to use, experiment by testing various water flow rates to establish a flow rate that ensures every plant in the flowerbed receives an adequate water supply. Deploy the system to run for one or two hours each and run twice or at most thrice weekly.
This will enable you to fine-tune your system depending on performance observed.
That experiment should offer a vital confidence boost in drip irrigation. Based on your findings, you can now proceed to measure your garden and draw a simple map of the same.
You’ll then select the type of watering device and the amount of pressure (water flow rate) to apply. These will be determined by your soil type and the watering needs of your plant.
Take careful note of the points and mark them on your sketch map.
Connect the various points on your map that will require watering. That effectively gives you the tubing route for your system. At this point, aim for practicability, not perfection.
You’ll be able to select an appropriate watering device once we cover them in great detail. For now, just exercise a little patience and read on.
Make connections on your map to ensure every flower bed or garden on your land is covered by the tubing circuit so that all the root zones are covered.
Plant Water Requirements
Water requirements by plants are influenced by a multiplicity of factors that interrelate in a somewhat complex fashion. They are:
- Plant size
- Leaf coverage at the canopy
- Soil type (clay soils retains more water than sandy soils)
- Water quality
- Amount of solar radiation
- Growth stage of the plant
- Ground cover
- Rain
- Surrounding temperature and humidity
- Wind conditions (wind speeds up evaporation)
- Fertilizers and chemicals used
Purchase Drip Irrigation Equipment
You’ll require pipes, emitters, plastic fitting for connections, flush valve, among other equipment that will be mentioned as you continue reading subsequent sections.
- Before you purchase, do a comparative analysis of all the sizes and threads needed. You’ll require connectors to piece pipes of varying diameters together.
- It’s recommended that you use black polyethylene if using a lateral line. Avoid PVC piping as it’s affected by continuous exposure to sunlight. Therefore, it works best in where it’s buried underground away from direct light.
- If using a mainline, you have a wide variety of materials for piping to explore; galvanized steel, copper, PEX, heavy polyethylene, and PVC. However, as earlier mentioned, bury the PVC underground.
- The maximum flow rate you can achieve is dictated by the size and type of your pipes. Ordinarily, homes are fitted with pipes of ¾ in for domestic use, which supports a flow of 10 gallons(38 liters) per minute. You’ll need to adjust your pipes and valve accordingly in case your water supply has a higher flow rate.
- In cases where more pressure is required than is available on the normal water supply channels, a pumping mechanism is deployed. This is rare for limited domestic use but occurs where water needs to be pumped further in more sophisticated farming ventures.
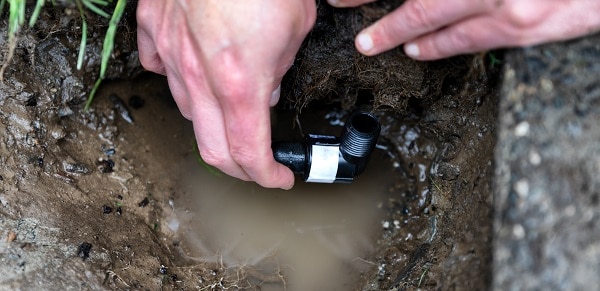
Connecting to the Water Supply
Connect to the main tube to your source of water. Ensure you have a backflow preventer, so that dirty water from the irrigation system does not flow back to contaminate the drinking water supply.
An effective backflow ensures total prevention of backflow resulting from backpressure. Prevents dirty garden water from flowing back into your household water lines.
Install a Water Filtration System
Filters remove suspended particles in the water that may lead to the clogging of emitters. This problem is common with low-cost drip systems but can occur in any setting when filters are not effectively used.
Endeavor to use proper filtration always as inadequate filtration or poor filter maintenance can destroy your drip irrigation system.
The filter may be part of the backflow gadget or maybe a separate device altogether.
Drip tubing may be clogged by rust, mineral sediments, and other physical elements. A mesh size of 155 (100 microns) or higher will suffice.
Connect a Pressure Reducing Valve
The function is as the name implies, lowering the pressure of incoming water. A pressure reducing valve lowers incoming water pressure proportionately to the drip irrigation system’s required pressure levels.
A drip irrigation functions at very low pressure as water is delivered in drops through the emitters. Install the device where the system water pressure exceeds 40 psi so that you can lower it to a pressure level of 25-30 psi, which is ideal for most household drip irrigation needs.
Note: Applying to much water exposes your plant to root disease and increases operating costs. However, applying insufficient water dehydrates your plant and causes your soil to dry. Maintain a pressure level that delivers just enough water to the emitters and plants.
Fit the Lateral Line if Necessary
A lateral line is necessary where you have several drip lines that emanate from the lateral line.
Install the PVC lateral line and connect the various drip lines that will join it. Prolonged exposure to sunlight damages PVC material. Therefore, bury it to protect it or seal it with aluminum tape.
Cut and Connect the Drip Line Tubing to the Length You Need
- Cut the drip tubing to your desired length using pruning shears or a tubing cutter.
- The tubing is easier to work with if left to warm in the sun or when dipped in hot water. It softens the plastic making it more pliable.
- Insert the drip tubes into a connector adapter and the link to your pressure regulator or the lateral line.
- The connectors may be elbows when making 90° bends or T-connectors when creating branches.
- Lay the drip lines on the garden bed as per your plan.
- Cover tubing with mulch if need be; PVC should be covered from direct sunlight to prevent UV-deterioration. However, do not bury the lines deep down to avoid them being damaged by rodents.
- Where rodents pose a potential problem, carry out some pest controls before installing your drip tape.
- Include control valves on each drip line where several drip lines have been connected to the lateral line if you would like to regulate them independently. With that done, you can shut down a particular line if you so wish while increasing the flow rate on another.
- Stake the drip lines on your garden bed to ensure they are robust.
Connect the Emitters
Finally, you can connect the emitter types for the plants in your garden- drippers, shrubblers, or micro sprayers.
Use a punch tool to create a small hole on the tubing then embed the emitter firmly.
Avoid using nails and other crude objects as they’ll create an irregular hole that will be leaky and uneven.
You can insert your emitter directly on the ½ inch drip line. Otherwise, you can use a barbed connector to link the drip line to smaller feeding tubes measuring ¼ inch where you have a more elaborate pipe layout.
You can always use a goof plug to seal the holes that you mistakenly punch into your tubing.
Pre Perforated vs. Unperforated Tubings
You can purchase tubing that has been pre-punched at the factory with emitters spaced out at regular intervals of 18 inches on the surface of the tubing. This seems to make it easier for you but is rigid and not customizable to your plant’s watering needs that may differ with factory settings.
Unperforated tubings, on the other hand, allow you the responsibility and convenience to punch holes and insert emitters tailored to your watering needs. The process is simple, and mistakes easily find redemption in a standby goof plug that readily seals accidentally punched holes.
Other companies still produce soaker hose, a rubber that is laser-perforated and discharges water along its entire length, thus requiring no emitters to function.
Test the Drip Irrigation System
Go ahead and test the system once the installation is complete. Run water through the system to flush out dirt. Run the system for an hour and check if the area around your root zones is receiving water.
Tweak the system until you are happy with the outcome. Check if the water delivered is adequate, or there is a need to adjust the watering time or pressure or shift the emitters to where they’re needed most.
Maintain Your Drip Irrigation System
Once properly set-up, the system must be maintained if it is to consistently deliver and last long.
Filter Flashing and Cleaning
This is routine daily maintenance practice for your irrigation filters. Do it as prescribed by the manufacturer’s maintenance guidelines.
Lateral Flashing
Lateral flushing removes physical debris that may pile up in the tubing system. This should be done every 2-3 weeks during the irrigation season. The system is flushed by opening the lateral end for a minute until clear water comes out of the lateral.
Chlorination
Chlorine injection minimizes clogging as a result of organic materials. It can be used occasionally or continuously where the water used contains a lot of organic material. Sodium hydrochloride (10-12%) is commonly used for this.
Acid Treatment
This is a routine maintenance procedure to reduce clogging caused by slats in the system. The application of acid is recommended as part of a routine maintenance procedure. Acid injection reduces clogging caused by low solubility salts, such as calcium in areas with freezing calcium carbonate. It is recommended that it’s done twice during the irrigation season or if the water output falls by 5% or more.
Winterization
In cold climates, remove enough water from the system using a high-volume air compressor so that freezing and expanding of water will not crack the components. Then open all manual flush valves and dismantle all automatic flush valves.
Repair Damaged Tubes
Tubing repair is simple to carry out:
- Locate the damaged or punctured area of the tubing.
- Unearth the tubing and chop off the damaged section.
- Run the system from both sides to ensure it’s unobstructed or to remove blockages if any.
- Rejoin the line by installing a barbed connector.
Materials Needed for Setting up a Drip Irrigation System
You’ll require the following materials to successfully set-up a drip irrigation system. This checklist is handy as you shop:
- A pair of cutting shears
- 1/2-in. poly tubing
- 1/4-in. vinyl tubing
- Connectors
- A timer
- Watering devices (emitters)
- backflow preventer
- Barbed fittings
- Filter
- pressure regulator
- small stakes
- watering devices
What Should I Consider When Buying a Drip Irrigation System?
It’s advisable to purchase a complete drip irrigation system kit rather than purchasing separate individual components. This is what you need to consider as you shop for an irrigation kit supplier.
- Tubing – Ensure that the tubing provided will cover the entire length that you need as per your sketch map. Check the entire tubing route is covered from the hose to the most distant root zone factoring in all the tubing that diverts off the mainline.
- Fittings – Fittings are the connectors between tubings such as elbows and drip tees, connectors, drip drill bit, that allow for complete connectivity in the system. Are they adequately provided in the kit?
- Emitter – The emitter is the discharging point of the drip irrigation system. Ensuring the drip irrigation package you purchase offers a variety of emitters. This should be sufficiently flexible to allow you to meet different watering needs without having to disassemble your system or purchasing entirely new ones.
- Stakes/Fasteners – Stakes and fasteners improve your distribution network’s stability by pinning your tubings down to the ground so that they don’t move haphazardly. Ensure there are enough of these in the kit.
- Risers – Ensure your drip irrigation system has risers included. Risers lift irrigation tubing allowing water to drip from above.
- Tools – These are the tools you’ll require to assemble the drip irrigation system. Not all drip irrigation systems come with this. However, this should not be a deal-breaker if the system you prefer lacks assembling tools. Assembling tools are fairly affordable, or you probably have them.
- Goof plugs – Plugs help fill in any holes that may occur on the tubing. The tubing can be accidentally punctured, or you may have punched a hole at the wrong interval and you need to cover up your tracks. Check that these are included in the pack.
- Faucet Connector – This connects the irrigation tubing to the hose bib. This component is vital. Ensure it’s provided in the kit.
- Splitter – The splitter acts to help the water divert from the main tube and other branching tubings. Some irrigation systems do not offer it, but you’re better off getting a system that does.
- Teflon Tape – This helps prevent leaks but shouldn’t be the main determinant in choosing an irrigation system.
Watch this video review of 5 top drip irrigation kits to better select one that suits you:
Common Problems in Using Drip Irrigation System
Despite the numerous benefits derived from using drip irrigation systems, drip irrigation, like any other system, has its drawbacks in crop production:
- Clogging of emitters by soil particles, organic materials, fertilizers, or other chemicals due to the small nozzle.
- Damage on the pipe network by rodents such as moles
- Achieving uniform water distribution is difficult in unleveled fields due to elevation differences
- Salinization, which is the accumulation of salts in the soil sometimes to toxic levels, can occur in root zones over some time.
- The seasonal removal of drip lines for the harvest season and during soil preparation for seasonal crops
- The challenge of doing mechanical weeding where there are pipes
- Setting up drip irrigation where you already have a fully developed root system for perennial crops can be challenging
Pro Tip: The best time to water plants is early morning or in the evening when it’s cool, and the plant roots can absorb much of the water before evaporation increases as it gets hotter in the day.
Final Thoughts
I hope you have found invaluable information that will help you set up your budget drip irrigation and begin to enjoy the benefits that accrue from using the system. You have understood the mechanism of drip irrigation, the benefits, the components, the steps involved in setting up and managing a drip irrigation system, and the limitations thereof.